Blenderで自作したキャラクターをUnityで動かす 前編
はじめに
Blenderでキャラクターを作成し,Unityで動かしました. 備忘録として残しておきます. Unityでのキャラクター操作には,Standard Assetsを使用しました. 今回は,Blenderでのキャラクター作成です.
各ソフトのバージョン
Blender 2.91 Unity 2019.4
準備
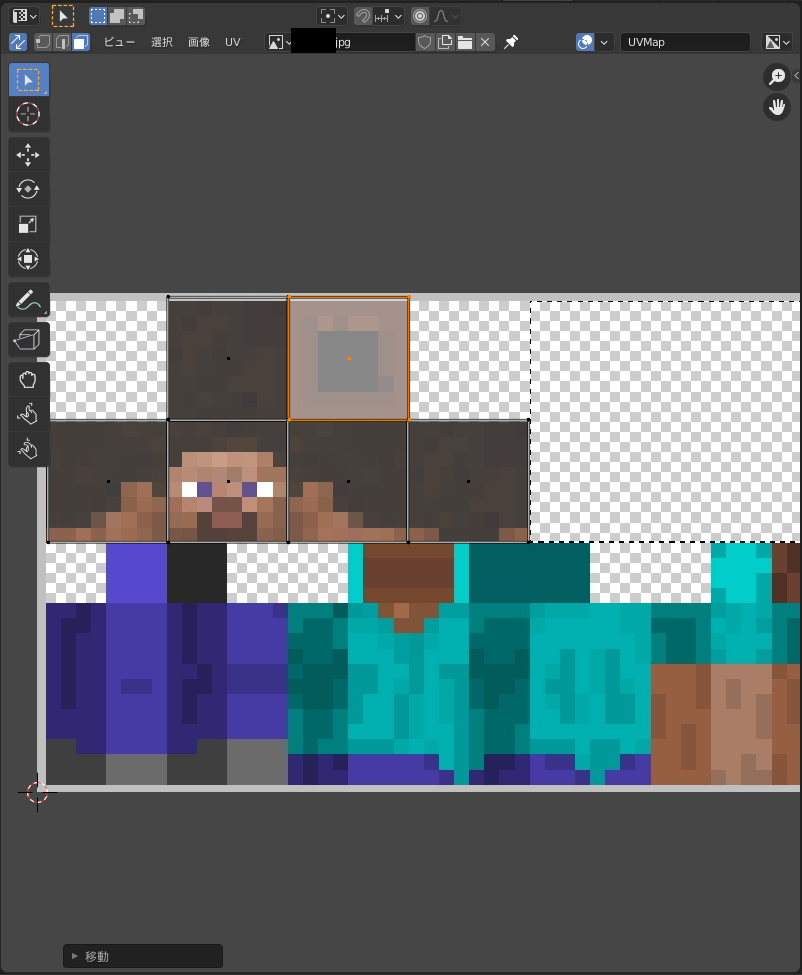
キャラクターのモデリングに必要な三面図とテクスチャ画像を準備しておきます.
今回は,MineCraftのスティーブを使用しました.
スティーブは単純なモデルなので,今回は下のようなテクスチャ画像のみを使用しました.

モデリング
Blenderでの作業に入ります.
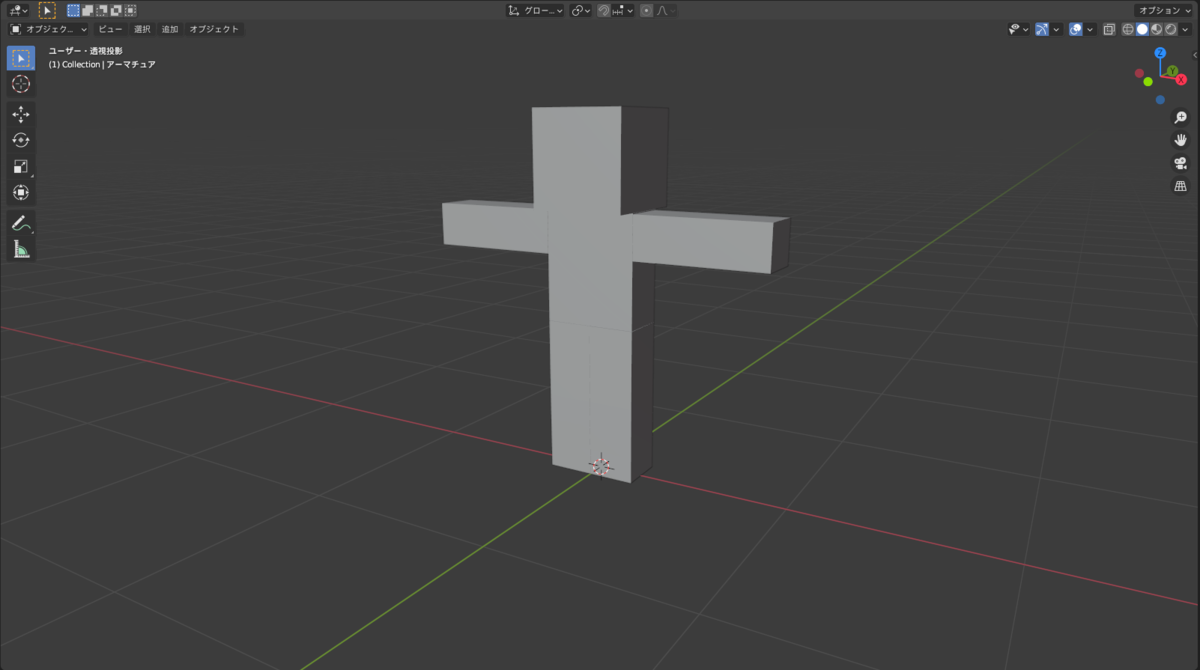
Shift+A>画像>背景から下絵を配置し,これに合わせてモデリングをします.
今回は,Cubeの組み合わせで作成できます.
テクスチャを貼る
テクスチャ画像をUVマッピングで行います. 右側のテクスチャウィンドウから新規を選択して,テクスチャ画像を選択します.

レイアウトをUV mappingに切り替えて,先程設定したテクスチャに切り替えます.

テクスチャ画像に合わせて,シームをつけます. 辺選択モードに切り替えて,シームをつける辺を左クリック,右クリックをするとシームをマークできます.

左上の矢印を選択すると,3Dビューポートで選択した頂点がUVマップと同期されます. テクスチャ画像とシームで展開されたものを合わせていきます.
シェーダーエディターを開き,Shift+A>テクスチャ>画像テクスチャを選択,ノードをつなげます.


これで,3Dビューポートでテクスチャを選択すると,テクスチャがはられたモデルを見ることができます.

リグをつけて動きを確認する
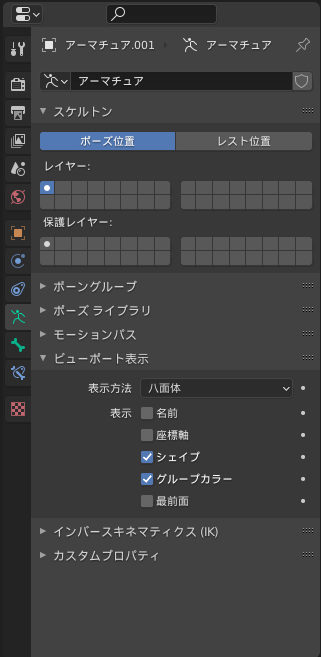
Shift+A>アーマチュアでボーンを追加します. これをある程度関節に合わせて配置していきます.腰から作成するとやりやすいです. このとき,右側のボーンのウィンドウから最前面にチェックをするとボーンが外から見えるようになります.
ボーンを一端から追加するのはEキー,足は左上の追加からボーンを追加して作成しました. 完成したものがこちらです.

ここで,各ボーンの親子関係(ヒエラルキーウィンドウからドラッグアンドドロップまたは,Pキー)を腰の子供に足を置くようにしてください.

モデルが複数パーツある場合は,統合(オブジェクトを右クリック)してください. アーマチュア→モデルの順番で選択し,左上のオブジェクト>ペアレント>自動のウェイトでを選択します. この時点で,ボーンを動かすとモデルがそれに追従すると思います. ボーンを動かしたときのモデルの歪みはウェイトペイントから行います.
出力
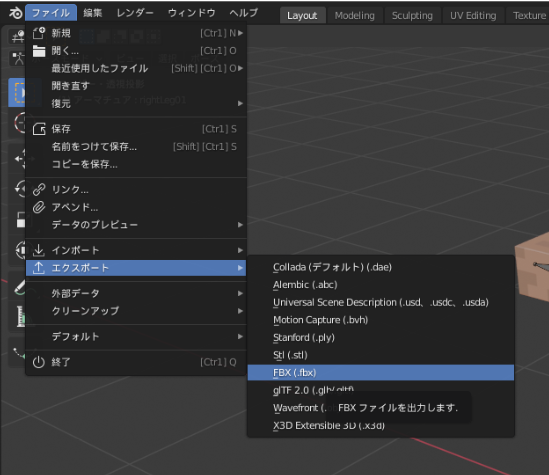
ファイル>エクスポートから.fbx形式で出力します.
おわりに
次回は,これをUnityで動かします.
参考
編入・転科してよかった
はじめに
筑波大学に編入して1年経ったので総括です。 良ければ編入の参考にしてください。
生活
現在筑波で一人暮らしをしています。 これまで2ヶ月の留学を除いてここまで長期で実家を出ることがなかったので、いろいろ大変な面もありますが楽しくやれています。 周りの編入生はみんな一人暮らしなのでエンドレスで宅飲みできます。 実家ぐらしのときも門限があったわけじゃないですが、一人暮らしだと気兼ねないです。 大変なこととしては食事です。3食栄養バランスの取れた食事が出てくるというのはありがたいことだったと感じる日々です。
- よかったこと
- ひとりでの対応力が上がる
- 宅飲みは安上がり
- 門限がない
- 好きなタイミングで食事が取れる
- 麻雀楽しい
- 大変なこと
- 家事全般がだるい
- 栄養の取れた食事
勉強
転科だったので、4~6月は右も左もわからないことが多くありました。というのも、3年から学習するのは専門教科で基礎はできている前提です。
機械工学科ではもちろんデータベース(SQL)やコンパイラやRuby On Railsなどは勉強しませんし、プラグラミング言語もC言語を1ミリペロッと触るぐらいでした。
そういった基礎の勉強は当然自主勉強で補う必要があるわけです。そういう意味で4~6月あたりは基礎の勉強を家でやる日々でした。
とわいえ、わからない部分も多くありました。多くの課題やテスト勉強は同期の編入生に助けてもらいました。本当にありがとうございました。
単位変換に関しても、自分の場合67単位(最大80単位で多くの編入学生は75単位程度)のためある程度授業を取らざるを得ない状況でした。
結果、2単位落としてしまいましたが今年44単位取得できたので来年は卒業研究抜きで7.5単位で卒業できます。なんとかなりそうです。
また、夏季休業には3週間ではありましたがアメリカへの留学もできました。

- よかったこと
- 有能な編入生と出会えたこと
- 大学生活できる
- 圧倒的成長できる
- 休業長い
- 大変なこと
- ありすぎて困るが、全部勉強
- 後悔していること
- なし
総括
編入してよかっっっっっっっっっった。 編入したデメリットはお金以外存在しません。 周りの編入生は非常に優秀です。自分なんか糞ほどなにもできません。だからこそ、どう勉強したらいいか、どういうポジションにたてばいいか考えながら立ち回るのが楽しいです。 自分は大学院まで行こうと思っているので、あと3年で成長して高専卒で就職した人より有能になって就職してやろうと思う限りです。
【Kotlin】サイドメニューで画面遷移してみる
はじめに
前回DrawerLayoutをつかってサイドメニューを実装しましたが、今回加えて画面遷移をする必要があったのでやってみます。前回の記事はこちらです。
mtryo1021.hatenablog.com
画面遷移には、Fragmentを使用します。なので、実際には画面遷移しているわけではなくMainActivityのFragment部分に対応するレイアウトファイルを挿入する形になります。
前回の記事との重複になるところがありますが、いちから実装を書いていきます。(下記忘れているとこがあったので....)
概ね参考文献のままですがKotlinへの書き換えおよび、必要に応じて書き換えを行っています。
参考文献は最後に載せています。
完成目標
完成は以下のようになります。


準備
準備としてbuild.gradle(Module: app)に以下を書き加えます。build.gradle(Module: app)
implementation 'com.android.support:design:28.0.0'
レイアウトファイルの作成
必要なレイアウトファイルを作成していきます。まず、activity_main.xmlから編集します。
activity_main.xml
<android.support.v4.widget.DrawerLayout xmlns:android="http://schemas.android.com/apk/res/android"
    xmlns:app="http://schemas.android.com/apk/res-auto"
    xmlns:tools="http://schemas.android.com/tools"
    android:id="@+id/drawer_layout"
    android:layout_width="match_parent"
    android:layout_height="match_parent"
    android:fitsSystemWindows="true"
    tools:context=".MainActivity"
    tools:openDrawer="start">

    <LinearLayout
        android:layout_width="match_parent"
        android:layout_height="match_parent"
        android:orientation="vertical">

        <include
            layout="@layout/header"
            android:layout_width="match_parent"
            android:layout_height="50dp"/>

        <FrameLayout
            xmlns:android="http://schemas.android.com/apk/res/android"
            android:id="@+id/frame_contents"
            android:layout_width="match_parent"
            android:layout_height="match_parent">

        </FrameLayout>
    </LinearLayout>

    <android.support.design.widget.NavigationView
        android:id="@+id/nav_view"
        android:layout_width="wrap_content"
        android:layout_height="match_parent"
        android:layout_gravity="start"
        android:fitsSystemWindows="true"
        app:headerLayout="@layout/nav_header"
        app:menu="@menu/nav_items" />

</android.support.v4.widget.DrawerLayout>
画面のヘッダー部分をheader.xmlとして作成します。
ここでアクションバーのかわりにツールバーを使用します。
header.xml
<android.support.design.widget.CoordinatorLayout
    xmlns:android="http://schemas.android.com/apk/res/android" android:layout_width="match_parent"
    android:layout_height="match_parent">

    <android.support.design.widget.AppBarLayout
        android:id="@+id/appbar"
        android:layout_width="match_parent"
        android:layout_height="match_parent">

        <android.support.v7.widget.Toolbar
            android:id="@+id/toolbar"
            android:layout_width="match_parent"
            android:layout_height="match_parent" />

    </android.support.design.widget.AppBarLayout>

</android.support.design.widget.CoordinatorLayout>
サイドメニューのレイアウトの作成も行います。
まず、サイドメニューのヘッダーです。
nav_header.xml
<LinearLayout xmlns:android="http://schemas.android.com/apk/res/android"
    android:layout_width="match_parent"
    android:layout_height="176dp"
    xmlns:app="http://schemas.android.com/apk/res-auto"
    android:background="@color/colorPrimary"
    android:gravity="bottom"
    android:orientation="vertical"
    android:paddingBottom="16dp"
    android:paddingLeft="16dp"
    android:paddingRight="16dp"
    android:paddingTop="16dp"
    android:theme="@style/ThemeOverlay.AppCompat.Dark">

    <ImageView
        android:id="@+id/imageView"
        android:layout_width="wrap_content"
        android:layout_height="wrap_content"
        android:contentDescription="Navigation header"
        android:paddingTop="8dp"
        app:srcCompat="@mipmap/ic_launcher_round" />

    <TextView
        android:layout_width="match_parent"
        android:layout_height="wrap_content"
        android:paddingTop="8dp"
        android:text="Android Studio"
        android:textAppearance="@style/TextAppearance.AppCompat.Body1" />

</LinearLayout>
サイドメニューの内容はres/menu/に作成します。
nav_items.xml
<menu xmlns:android="http://schemas.android.com/apk/res/android">
    <group android:checkableBehavior="single">
        <item
            android:id="@+id/nav_item_category_1"
            android:icon="@drawable/ic_launcher_foreground"
            android:title="CATEGORY_1" />
        <item
            android:id="@+id/nav_item_category_2"
            android:icon="@drawable/ic_launcher_foreground"
            android:title="CATEGORY_2" />
    </group>

    <item android:title="Sub items">
        <menu>
            <item
                android:id="@+id/nav_sub_item_1"
                android:icon="@drawable/ic_launcher_foreground"
                android:title="SUB_ITEM_1" />
        </menu>
    </item>
</menu>
遷移先画面の作成
nav_items.xmlに記述の通り今回は3画面のレイアウトを作成します。fragment_category_one.xml
<android.support.constraint.ConstraintLayout
    xmlns:android="http://schemas.android.com/apk/res/android" android:layout_width="match_parent"
    android:layout_height="match_parent">

    <TextView
        android:layout_width="wrap_content"
        android:layout_height="wrap_content"
        android:textAppearance="?android:attr/textAppearanceLarge"
        android:text="The content for category 1" />
</android.support.constraint.ConstraintLayout>
fragment_category_two.xml
<android.support.constraint.ConstraintLayout
    xmlns:android="http://schemas.android.com/apk/res/android" android:layout_width="match_parent"
    android:layout_height="match_parent">

    <TextView
        android:layout_width="wrap_content"
        android:layout_height="wrap_content"
        android:textAppearance="?android:attr/textAppearanceLarge"
        android:text="The content for category 2" />
</android.support.constraint.ConstraintLayout>
fragment_sub_category_1.xml
<android.support.constraint.ConstraintLayout
    xmlns:android="http://schemas.android.com/apk/res/android" android:layout_width="match_parent"
    android:layout_height="match_parent">

    <TextView
        android:layout_width="wrap_content"
        android:layout_height="wrap_content"
        android:textAppearance="?android:attr/textAppearanceLarge"
        android:text="The content for sub category 1" />
</android.support.constraint.ConstraintLayout>
それぞれに対して、Kotlinファイルを作成しFragmentを継承したクラスを作成します。
onCreate()はそのままなので記述しなくても大丈夫です。
CategoryOne.kt
class CategoryOne(): Fragment() {
    override fun onCreate(savedInstanceState: Bundle?) {
        super.onCreate(savedInstanceState)
    }

    override fun onCreateView(inflater: LayoutInflater, container: ViewGroup?, savedInstanceState: Bundle?): View? {
        return inflater.inflate(R.layout.fragment_category_1, container, false)
    }
}
CategoryTwo.kt
class CategoryTwo(): Fragment() {
    override fun onCreate(savedInstanceState: Bundle?) {
        super.onCreate(savedInstanceState)
    }

    override fun onCreateView(inflater: LayoutInflater, container: ViewGroup?, savedInstanceState: Bundle?): View? {
        return inflater.inflate(R.layout.fragment_category_2, container, false)
    }
}
SubCategoryOne.kt
class SubCategoryOne(): Fragment(){
    override fun onCreate(savedInstanceState: Bundle?) {
        super.onCreate(savedInstanceState)
    }

    override fun onCreateView(inflater: LayoutInflater, container: ViewGroup?, savedInstanceState: Bundle?): View? {
        return inflater.inflate(R.layout.fragment_sub_category_1, container, false)
    }
}
サイドメニューを適用
サイドメニューを開閉するためにstring.xmlを編集します。strings.xml
<string name="nav_open">Navigation Drawer Open</string>
<string name="nav_close">Navigation Drawer Close</string>
ここまでできたらMainActivity.ktを編集していきます。
クラスがNavigationView.OnNavigationItemSelectedListenerを継承しているので注意してください。
MainActivity.kt
class MainActivity : AppCompatActivity(), NavigationView.OnNavigationItemSelectedListener {

    override fun onCreate(savedInstanceState: Bundle?) {
        super.onCreate(savedInstanceState)
        setContentView(R.layout.activity_main)

        this.setToolbar()
        this.setDrawerLayout()
    }

    private fun setToolbar(){
        setSupportActionBar(toolbar)
        supportActionBar!!.setDisplayShowHomeEnabled(false)
    }

    private fun setDrawerLayout(){
        val toggle = ActionBarDrawerToggle(Activity(), drawer_layout, toolbar, R.string.nav_open, R.string.nav_close)
        drawer_layout.addDrawerListener(toggle)
        toggle.syncState()
        nav_view.setNavigationItemSelectedListener(this)
    }

    override fun onNavigationItemSelected(item: MenuItem): Boolean {
        var fragment: Fragment? = null
        when (item.itemId) {
            nav_item_category_1 ->
                fragment = CategoryOne()
            nav_item_category_2 ->
                fragment = CategoryTwo()
            nav_sub_item_1 ->
                fragment = SubCategoryOne()
        }
        // Replace the fragment.
        if (fragment != null) {
            val ft = supportFragmentManager.beginTransaction()
            ft.replace(R.id.frame_contents, fragment)
            ft.commit()
        }
        // Close the Navigation Drawer.
        drawer_layout.closeDrawer(GravityCompat.START)
        return true
    }
}
最後にアクションバーを無効化するためにstyles.xmlを編集します。
これは、新しいstyleを作成しManifestに適用するstyleを変更しても大丈夫です。
styles.xml
<style name="AppTheme" parent="Theme.AppCompat.Light.DarkActionBar">
        <!-- Customize your theme here. -->
        <item name="colorPrimary">@color/colorPrimary</item>
        <item name="colorPrimaryDark">@color/colorPrimaryDark</item>
        <item name="colorAccent">@color/colorAccent</item>

        <item name="windowActionBar">false</item>
        <item name="windowNoTitle">true</item>
</style>
まとめ
完成!サイドメニューを実装するだけでいかにもな感じになりますね!
ではでは....
参考文献
noknow.infoyoutu.be
stackoverflow.com
【Kotlin】EmptyActivityからサイドメニューを作成してみる
~追記(2018.11.25)~
新しい記事を書きました。
こちらのほうがサイドメニューの作成に関してわかりやすいと思います。
mtryo1021.hatenablog.com
はじめに
サイドメニューを作る機会があったので自分用のメモがてら書きます。サイドメニュー自体はActivityを追加する段階でDrawerNavigationActivityから作成することができますが、今回はEmptyActivityから実装する方法です。
参考文献は一番下に書いておきます。
レイアウトの追加
サイドメニューにはいくつかレイアウトを作成する必要があるので作成します。まず、サイドメニューの主となるレイアウトです。
layout>New>Layout resource fileからapp_bar_drawer.xmlを作成します。
親のタグをCoordinatorLayoutにすることに注意してください。
app_bar_drawer.xml
<android.support.design.widget.CoordinatorLayout xmlns:android="http://schemas.android.com/apk/res/android"
    android:layout_width="match_parent"
    android:layout_height="match_parent">

    <android.support.design.widget.AppBarLayout
        android:layout_width="match_parent"
        android:layout_height="wrap_content">

        <android.support.v7.widget.Toolbar
            android:id="@+id/toolbar"
            android:layout_width="match_parent"
            android:layout_height="?attr/actionBarSize"
            android:background="#3366cc">
        </android.support.v7.widget.Toolbar>


    </android.support.design.widget.AppBarLayout>

    <TextView
        android:id="@+id/message"
        android:layout_width="wrap_content"
        android:layout_height="wrap_content"
        android:layout_gravity="center"
        android:text="Message"
        android:textColor="@android:color/darker_gray"
        android:textSize="24dp"/>

</android.support.design.widget.CoordinatorLayout>
つぎに、ヘッダーのデザインをdrawer_header.xmlを作成します。
drawer_header.xml
<LinearLayout
    xmlns:android="http://schemas.android.com/apk/res/android"
    android:layout_width="match_parent"
    android:layout_height="wrap_content"
    android:orientation="vertical"
    android:background="@color/colorPrimary"
    android:padding="20dp">

    <TextView
        android:layout_width="match_parent"
        android:layout_height="wrap_content"
        android:layout_marginTop="20dp"
        android:textSize="24dp"
        android:textColor="@android:color/white"
        android:text="SideMenu Header"/>

    <TextView
        android:layout_width="match_parent"
        android:layout_height="wrap_content"
        android:gravity="right"
        android:textSize="24dp"
        android:textColor="@android:color/white"
        android:text="Mt.Ryo"/>

</LinearLayout>
サイドメニューの要素となる部分はMenuに追加します。
res下にmenuフォルダがない場合は作成後menu_drawer.xmlを作成します。
menu_drawer.xml
<menu xmlns:android="http://schemas.android.com/apk/res/android">
    <group>
        <item
            android:id="@+id/item1"
            android:title="Item1"/>
        <item
            android:id="@+id/item2"
            android:title="Item2"/>
        <item
            android:id="@+id/item3"
            android:title="Item3"/>
    </group>
</menu>
これまで作成したレイアウトをactivity_main.xmlに追加していきます。
親タグをDrawerLayoutにするのに注意してください。
activity_main.xml
<android.support.v4.widget.DrawerLayout xmlns:android="http://schemas.android.com/apk/res/android"
    xmlns:app="http://schemas.android.com/apk/res-auto"
    xmlns:tools="http://schemas.android.com/tools"
    android:id="@+id/drawer_layout"
    android:layout_width="match_parent"
    android:layout_height="match_parent"
    tools:context=".MainActivity">

    <include
        layout="@layout/app_bar_drawer"
        android:layout_width="match_parent"
        android:layout_height="match_parent" />

    <android.support.design.widget.NavigationView
        android:id="@+id/navigation_view"
        android:layout_width="match_parent"
        android:layout_height="match_parent"
        android:layout_gravity="start"
        android:fitsSystemWindows="true"
        app:headerLayout="@layout/drawer_header"
        app:menu="@menu/menu_drawer"/>

</android.support.v4.widget.DrawerLayout>
strings.xmlの編集
サイドメニューを開閉するためにstrings.xmlを編集します。書きを
strings.xml
<string name="nav_open">Open Navigation Drawer</string>
<string name="nav_close">Close Navigation Drawer</string>
サイドメニューを適用する
MainActivity.ktにサイドメニューの適用するための初期化関数を追加します。MainActivity.kt
private fun init(){
        val toggle = ActionBarDrawerToggle(Activity(), drawer_layout, toolbar, R.string.nav_open, R.string.nav_close)
        drawer_layout.addDrawerListener(toggle)
        toggle.syncState()
        navigation_view.setNavigationItemSelectedListener(this)
}
サイドメニューのアイテムのリスナーを追加します。
MainActivity Classの継承にNavigationView.OnNavigationItemSelectedListenerを追加してリスナーをオーバーライドします。
リスナー内のwhen文を変えることでそれぞれの動きを書くことができます。
MainActivity.kt
class MainActivity : AppCompatActivity(), NavigationView.OnNavigationItemSelectedListener {

    override fun onCreate(savedInstanceState: Bundle?) {
    ....

    override fun onNavigationItemSelected(item: MenuItem): Boolean {
            when(item.itemId){
                item1->{
                    message.text = item.title
                }
                item2->{
                    message.text = item.title
                }
               item3->{
                    message.text = item.title
                }
                else->{

                }
            }
            drawer_layout.closeDrawer(GravityCompat.START)
            return true
    }
}
サイドメニューを許可する
このままだとBuildでThis Activity already has an action bar supplied by the window decor.
といわれエラーを吐かれてしまいます。
なので、解決します。
res/value/styles.xmlから編集します。
styles.xml
<style name="AppTheme.NoActionBar">
        <item name="windowActionBar">false</item>
        <item name="windowNoTitle">true</item>
</style>
AndroidManifest.xmlを編集します。
themeの部分を先ほど作成したNoActionBarにします。
AndroidManifest.xml
<activity android:name=".MainActivity"
    android:theme="@style/AppTheme.NoActionBar">
</activity>
おわりに
完成!ではでは...
参考文献
www.youtube.comstackoverflow.com
【Kotlin】端末内の音楽でMediaPlayerをつくってみる
はじめに
前回端末内の音楽をListViewに表示してみました。見ていない方はこちらの記事を見てください。
今回はそれをつかって音楽を再生するMediaPlayerをつくってみたいと思います。
準備
今回は再生はListViewのアイテムを押したとき、停止はボタンで操作しようと思いますのでLayoutでボタンを配置します。ボタンの位置は適当でいいです。IDはstopButtonとしています。
クリックリスナーの作成
再生にはMediaPlayerをつかうのでMainActivityの上の方でインスタンスをつくります。MainActivity.kt
private val mp = MediaPlayer()
リスナーはOnCreate()内でつくります。
まず、ListViewのリスナーです。
MainActivity.kt
listView.setOnItemClickListener { parent, view, position, id ->
            //再生している曲を一旦停止
            mp.pause()
            mp.seekTo(0)
            //押されたアイテムの情報を取得
            val songTitle = view.findViewById<TextView>(R.id.titleText).text.toString()
            val songUri = view.findViewById<TextView>(R.id.uriText).text.toString()
            mp.reset()
            //曲をセット
            mp.setDataSource(songUri)
            mp.prepare()
            //曲を再生
            mp.start()
            toast("Play: ${songTitle}")
}
再生自体は、mp.start()でできますがそのまえにこれまで再生されている曲を停止します。
これをしないと連続でListViewを押したときアプリが停止します。
次に、停止ボタンのリスナーをつくります。
MainActivity.kt
stopButton.setOnClickListener {
            mp.pause()
            mp.seekTo(0)
            toast("Stop")
}
まとめ
これだけです。簡単でしたが、これで終わります。
目覚ましなんかで使いたいときはintentをつかってURLを渡してくれば大丈夫です。
ではでは...
【Kotlin】端末内の音楽をListViewに表示してみる
はじめに
今回はAndroid StudioでKotlinを使って端末内に入っている音楽をListViewに表示させたいと思います。個人的に苦労したのでメモとして残しておきたいと思います。
コードが冗長になっているところもあると思いますが、使用する際には適宜修正を加えてください。
参考にしたサイトは最後にも載せています。
準備
アプリを作成し、EmptyActivityで開始します。今回はToastしか使用していませんが、anko-comonを導入します。
build.gradleにそれぞれを追記します。
build.gradle(Project: ...)
ext.anko_version = "0.10.5"
build.gradle(Module: app)
implementation"org.jetbrains.anko:anko-common:$anko_version"
ストレージの許可
ストレージを利用するので、アプリの最初で許可を促す必要があります。まず、マニフェストに下記を追加します。
AndroidManifest.xml
<uses-permission android:name="android.permission.READ_EXTERNAL_STORAGE" />
MainActivityに下記を追加します。
ここで使用しているgetSongs()はのちに作成しますので安心してください。
MainActivity.kt
override fun onCreate(savedInstanceState: Bundle?) {
        super.onCreate(savedInstanceState)
        setContentView(R.layout.activity_main)

        if (Build.VERSION.SDK_INT >= 23) {
            checkPermission()
        } else {
            //あとで作成する
            getSongs()
        }
}

fun checkPermission() {
        // 既に許可している
        if (ActivityCompat.checkSelfPermission(this,
                        Manifest.permission.READ_EXTERNAL_STORAGE) == PackageManager.PERMISSION_GRANTED) {
            getSongs()
        } else {
            requestReadPermission()
        }// 拒否していた場合
    }

    private fun requestReadPermission() {
        if (ActivityCompat.shouldShowRequestPermissionRationale(this,
                        Manifest.permission.READ_EXTERNAL_STORAGE)) {
            ActivityCompat.requestPermissions(this@MainActivity,
                    arrayOf(Manifest.permission.READ_EXTERNAL_STORAGE), REQUEST_PERMISSION)

        } else {
            toast("アプリ実行に許可が必要です")

            ActivityCompat.requestPermissions(this,
                    arrayOf(Manifest.permission.READ_EXTERNAL_STORAGE),
                    REQUEST_PERMISSION)
        }
    }
画面作成
今回はListViewを使用するのでMainActivityに加えてAdapter用のEmptyActivityを追加してください。ここではSongAdapterという名前で作成しましたのでこれから先はその名前で説明します。まず、MainActivityですがListView(id: listView)さえあれば大丈夫です。あえていうならばlayout_widthとlayout_heightはmatch_constraintにした程度です。
続いて、SongAdapterの方ですが今回は曲のタイトルとURLを表示するリストを作成します。
マージンは適当にバランスを見てとっています。
adapter_song.xml
<?xml version="1.0" encoding="utf-8"?>
<android.support.constraint.ConstraintLayout xmlns:android="http://schemas.android.com/apk/res/android"
    xmlns:app="http://schemas.android.com/apk/res-auto"
    xmlns:tools="http://schemas.android.com/tools"
    android:layout_width="match_parent"
    android:layout_height="wrap_content"
    tools:context=".SongAdapter">

    <TextView
        android:id="@+id/titleText"
        android:layout_width="0dp"
        android:layout_height="wrap_content"
        android:layout_marginEnd="16dp"
        android:layout_marginLeft="32dp"
        android:layout_marginRight="16dp"
        android:layout_marginStart="32dp"
        android:layout_marginTop="16dp"
        android:text="TextView"
        android:textSize="18sp"
        android:textStyle="bold"
        app:layout_constraintEnd_toEndOf="parent"
        app:layout_constraintStart_toStartOf="parent"
        app:layout_constraintTop_toTopOf="parent" />

    <TextView
        android:id="@+id/uriText"
        android:layout_width="0dp"
        android:layout_height="wrap_content"
        android:layout_marginEnd="16dp"
        android:layout_marginLeft="32dp"
        android:layout_marginRight="16dp"
        android:layout_marginStart="32dp"
        android:layout_marginTop="8dp"
        android:paddingBottom="16dp"
        android:text="TextView"
        app:layout_constraintEnd_toEndOf="parent"
        app:layout_constraintStart_toStartOf="parent"
        app:layout_constraintTop_toBottomOf="@+id/titleText" />
</android.support.constraint.ConstraintLayout>
曲を取得する
ここまできたら早速曲を取得していきます。まず、曲を取得したときに格納するためのデータ型を作成します。
New/Kotlin File,ClassでSong.ktという名前のクラスを作成します。内容は以下のとおりです。
Song.kt
class Song(var title: String, var uri: String) {

}
getter、setterがいらないのでこのままで大丈夫です。
表示したい要素を増やしたい場合はこの引数を増やしてください。
では、MainActivityにgetSong()を追加します。
MainActivity.kt
private fun getSongs(){
       //contentResolverの初期化
        val cr = contentResolver
        val items = arrayOf(
                MediaStore.Audio.Media._ID,
                MediaStore.Audio.Media.DATA,
                MediaStore.Audio.Media.ARTIST,
                MediaStore.Audio.Media.ALBUM,
                MediaStore.Audio.Media.DURATION,
                MediaStore.Audio.Media.TRACK,
                MediaStore.Audio.Media.TITLE
        )
        //格納するArrayListの宣言
        val songs = ArrayList<Song>()
        val cursor = cr.query(
                MediaStore.Audio.Media.EXTERNAL_CONTENT_URI,
                items,
                null,
                null,
                null
        )
        cursor.moveToFirst()

        //データをsongsに格納する
        do{
            songs.add(
                    Song(
                    cursor.getString(cursor.getColumnIndex(MediaStore.Audio.Media.TITLE)),
                    cursor.getString(cursor.getColumnIndex(MediaStore.Audio.Media.DATA))))
        }while(cursor.moveToNext())

        //タイトルでソート
        songs.sortBy { it.title }
    }
ListViewに格納
AdapterをArrayAdapterを継承して作成します。SongAdapter.kt
class SongAdapter(context: Context , songs: ArrayList<Song>): ArrayAdapter<Song>(context, 0, songs) {
     //データを保持するホルダーのデータ型を宣言
    data class ViewHolder(val titleText: TextView, val uriText: TextView)

    //出力するためのgetView()をオーバーライド
    //※正直ほとんど決まり文句的な感じなのでListViewに関してはほかを参考にしてください
    override fun getView(position: Int, convertView: View?, parent: ViewGroup?): View? {
        var view = convertView
        var holder: ViewHolder

        val inflater = context.getSystemService(Context.LAYOUT_INFLATER_SERVICE) as LayoutInflater

        if (view == null) {
            view = inflater.inflate(R.layout.adapter_song, parent, false)
            holder = ViewHolder(
                    view.titleText,
                    view.uriText
            )
            view.tag = holder
        } else {
            holder = view.tag as ViewHolder
        }

        //取得したpositionにタイトルとURLを表示
        val song = getItem(position) as Song
        holder.titleText.text = song.title
        holder.uriText.text = song.uri

        return view
    }
}
Adapterを作成できたので、getSongs()で取得した曲のリストをadapterにセットします。
MainActivity.kt
    //getSongs()の最後の行に追加(ソートの下)
    val adapter = SongAdapter(this, songs)
    listView.adapter = adapter
まとめ
これで作成できたと思います。次回、これを再生するシンプルなMediaPlayerを作成したいと思います。
では次回........
参考サイト
code.tutsplus.comwww.usaco-pg.com
RailsでDeviseと用いてTweetしてみる
はじめに
前回、Deviseを使ってTwitter認証をしました。
mtryo1021.hatenablog.com
今回はこれを使ってTweetとDMをします。
Twitter Gemについて
今回、Twitter Gemを使います。
RubyでTweetする記事は多くありますので参考にしました。
まず、Gemをインストールします。
Gemfile
gem 'twitter'
$ bundle install --path vendor/bundle
Twitter GemでできることはTweetだけではありません。詳しくは、下のサイトを参考にしてください。
sites.google.com
Tweetする
TweetするにはREST Clientを動かす必要があります。それにトークンがいるのでsessionで持っておきます。以下をcallback_fromに追加します。
app/controllers/users/omniauth_callbacks_controller.rb
session[:oauth_token] = request.env['omniauth.auth']['credentials']['token']
session[:oauth_token_secret] = request.env['omniauth.auth']['credentials']['secret']
次にREST Clientを記述します。
今回はよく使うものなのでモジュール化してます。
lib/twitter_client.rb
module TwitterClient
  def rest_client
    Twitter::REST::Client.new do |config|
      config.consumer_key = ENV["TWITTER_CONSUMER_KEY"]
      config.consumer_secret = ENV["TWITTER_CONSUMER_SECRET"]
      config.access_token = session[:oauth_token]
      config.access_token_secret =session[:oauth_token_secret]
    end
  end
end
これで実際にTweetできるのでやってみます。
app/controllers/pages_controller.rb
def tweet
  rest_client.update(params[:content])
  flash[:notice] = "tweet: #{params[:content]}"
  redirect_to root_path
end
app/views/pages/tweet_form.html.erb
<h2>Tweet Page</h2>
<%= form_tag pages_tweet_path do %>
<label for="content">Content :</label><br>
<textarea name="content" id="content" rows="8" cols="80"></textarea><br>
<input type="submit" name="" value="Tweet">
<% end %>
先程作ったREST Clientをつかってupdateすると認証したアカウントからTweetできます。
また、DMを送りたいときは同じ要領で第1引数に送り先のID、第2引数に内容を入れるとDMを送れます。
DMは上に載せたdirect_message_createでは送信できませんでした。原因は不明...
rest_client.create_direct_message(params[:user_id], params[:content])
まとめ
ここまででRailsでTwitter関連を触ることができたと思います。コメント欄の作成もどんどん進めていきたいですね。
では、、、